Here is the Transcript:
Good day, people. The Oracle is with us today to help sort out these beautiful pico sal 389 388 switch machines. We got to set these up for DCC.
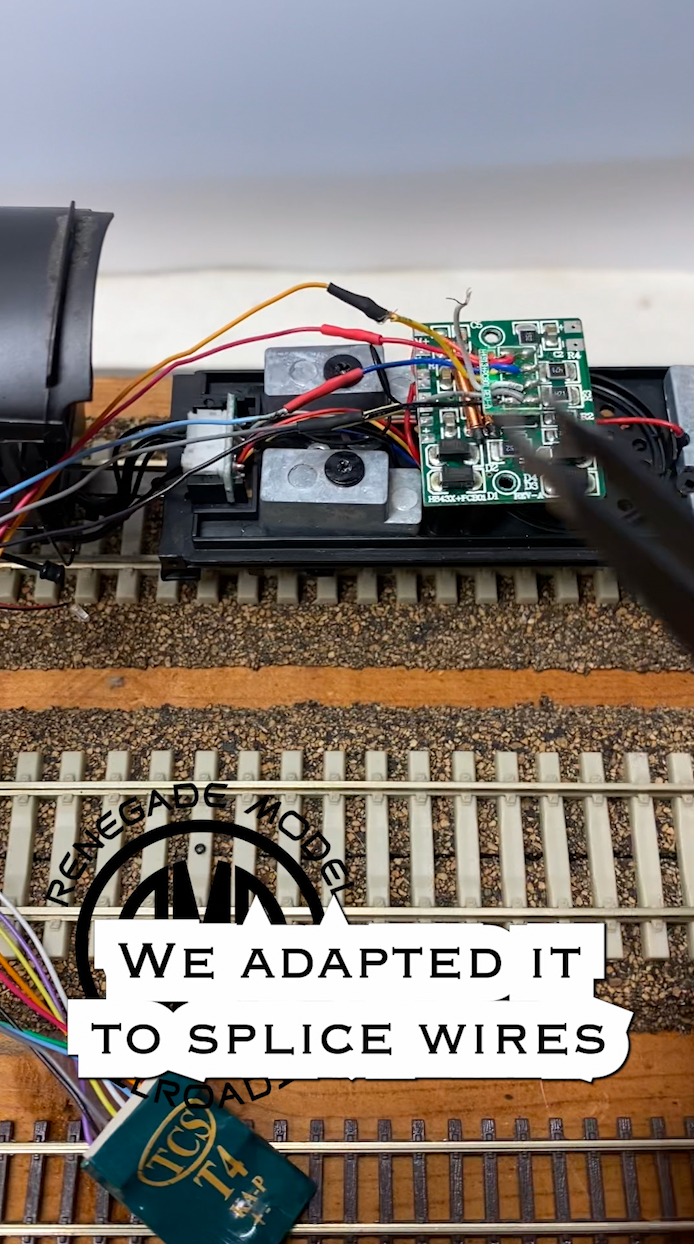
One thing you see here I'm doing is I'm pulling out the back clips. So these are going to be used with the tortoise switch machine. And basically, it's going to be a rod coming up through the layout that's going to be able to turn this side to side. So these originally from the manufacturer, have a plastic cover and then a V style clip with tint spring clip retention on it that will hold the points either direction.
You can operate that by hand. But like I said, we're going be using the tortoise switch machine, so we're going to get rid of that. And the other point is the points in the middle that actually are going to the frog. We're soldering those. Now, let's see. I'll wait until the next clip of soldering comes up. So let's see.
Here's another one. Yes, I'm using alcohol to clean it. And right there, soldering is going down in those points. And when you have a close up, you can see what it looks like in your hand. But basically what that's doing is it's giving it a solid connection between the actual points and the frog connections. And also creating a sort of, spring, spring tender, creating a tension on the rail.
So that way when they're flung to one side, that they will stay and keep tension on those rails in, you know, consideration with the, the tortoise switch machine. So we're just going through a couple of these. I fast forward the crap out of it just so you could see the process. What, you just saw him cutting off the ends.
If you're real picky, you can go back and put the ties back in. I didn't necessarily care. It just got real close where I didn't have to do that and look like it blended in together pretty well. Well, that's one thing you can do. Be careful with the soldering. If you use the starting iron too long, you will definitely melt the plastic and basically ruin the switch.
So you want to be real careful. Also getting some of those subtle points down to where the points are is a little bit difficult.
Hello. Hello. So in this video and of course, I want to add more context to it because just me on the screen, there's not enough it's not zoomed in enough. And I'm like, well, how am I going to show these guys what's going on? So I have a few that are, you know, for sale, whatever. But these haven't been altered or messed with the brand new out of the packaging.
And I'm going to show you, but I'm going to share with you a bunch of information, but also to find the same information to sort of in the little pamphlet, they give you the brochure with the PICO turnouts. They give you kind of how they need to be set up. And I'm not going to go through everything. But you can see in here, if you open it up, even they give you all the information.
This one's not as detailed. But yeah, they basically tell you, Hey, you get a slice of real here. Here to make it easy for DCC and that's that with this one. So what I'm doing on the video and this is actually is a unit frog. So this one, as you can see here it comes with this jumper wire.
You can take that and connect it to Tortoise Machine and it will automatically select a polarity for the frog when the train enters turn out, which is super helpful. These are on my California wild Wild fire and growth exhibit layout. And they're they were really good. The only thing is right at the points here or the end of the frog says, Turn around.
I cut these ties out better. I got these top two ties out just to get real joiners in there. But you can do it when you solder these be fast because if you hold the solder on it too long, this will melt the plastic and in turn it will melt this plastic right here. And you won't be happy.
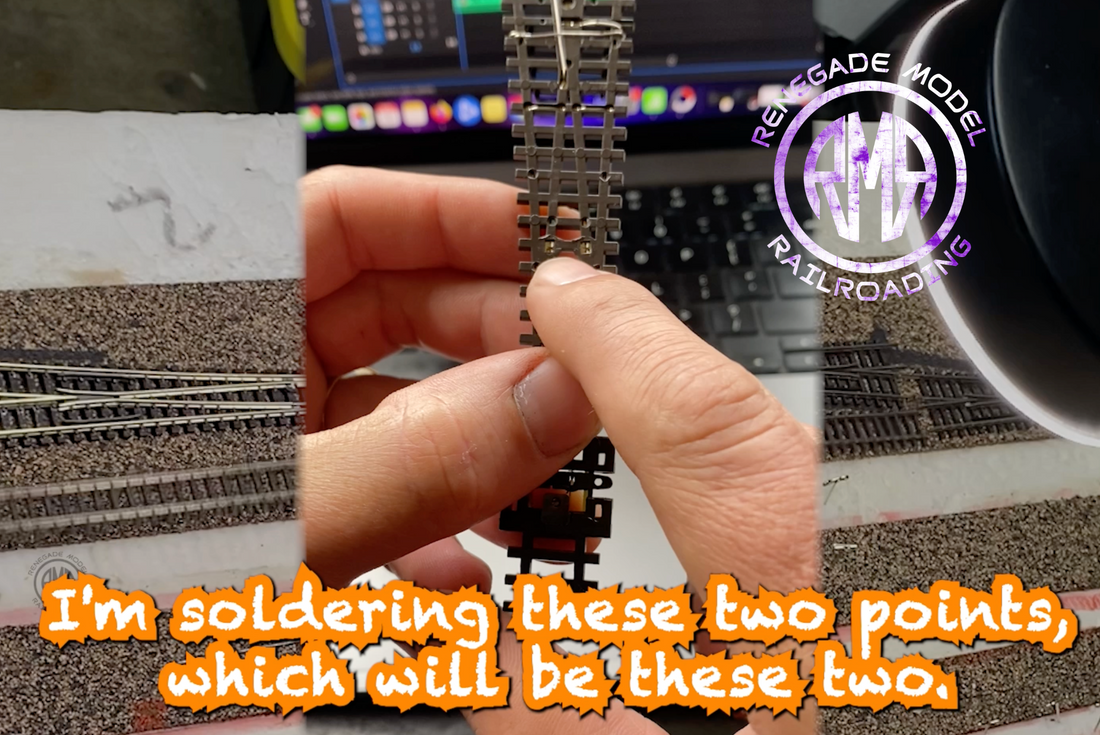
I mean, there's about 30, 35 of switch, so you want to be kind of careful. So yeah. And then also let's see if I can show you this. What I'm doing on the video is firstly, I'm. Let's see if I can see I'm in here. I'm starting these two points, which will be these two. So you do that because when you want the when to when the points here are thrown, you know.
Right. I know this still has a switch in it or the clip in it, but it kind of creates some connection here, which is good. And you want that. So that's why you do that, which in the video thing, I'll show you more. And then the other thing I'm doing also in the background is right in here. It depends.
If you want to hand through them, you can leave it like this and you just have a switch thrown like that. Or you take this clip out by prying up these two tabs you see here, here and here, right at the edge of my finger. Now for these two, and you take this off and carefully remove the spring, and then you have a free moving point system which you can attach to.
As you see here, there's two holes, two holes for either side. You can attach it sort of there or some of the switches based on the location on the layout. I've drilled out the center this piece right here very carefully and I've put the switch through there. And the tortoise thing, I got plans for another video on that, but that's going to be another day.
These videos are pretty involved and I like doing them, but I've been kind of busy lately, so anyways, that's kind of what you're looking at and what I'm doing in the background. This is a unit frog, as you can see. It has a jumper wire and I don't remember. I believe you still have to put either cut these gaps in the frog or use a insulator.
You have to go through it on, you know, figure that out. There's a bunch of information out there which I'm going to share with you, but on this one's pretty good with the unit frog. That helps. And then just to show you, give you some context, this is a regular electro frog with no unit frog. As you can see, there's no separation here, two by two or side by side, two by two.
Building a cabin. Now you see there's plastic gaps which will separate. So this area will be the one that's charged. However, on this one and this is why you have to set this up differently. This is just straight connection. And also they have a jumper wire that will connect these two points, as you see, because nothing's connected here.
So, yes, same thing as these are. These are little more work, I think, or feel. But yeah, two points disorder at the throw bar. So anyways, keep watching. I'm going to be sharing the website with you, which is also going to be the link I'm sharing in the description below. So here is the Pico Turn out website. This is not specifically made by Pico, some kind person went out of their way to create this website for help with the PICO turnouts and I'll go through it.
You can see here there's just a bunch of different style turnouts and then it will get to the electrical connections, which you will see there. There's so much information on these switches here. It's it's a bit ridiculous, but it'll answer all your questions. So there's another set up they give you curved turn out straight turnouts the let's see, scroll down here.
yeah. The back of it which I was showing you with the jumper wires. So this is a three point turn out. They have these set up and how you would attach it to a tortoise, which is good, which I might go over one day in a future video. But yeah, so the three point turnouts, regular turnouts, curve turnouts and also crossover is a sort of apply to many crossovers.
So that's it. Thanks for watching and feel free to check out that link below if you're in the PICO turnout building phase. Other than that, like sharing, subscribe and I will see you on the next video. Take care.